So.....What do I do whenever Kim is going to be out of my hair for a couple of days?
I think of a project to do of course!
So I had all kinds of projects that I thought that I would get done while he went to Warwick
But
I underestimated the time and the energy that taking apart
three pallets would take!
Yikes!!!!
You really need MAN POWER
to dismantle pallets!
Not even using a sawzall did the trick!
Anyway, in January when we were in the midst of our remodel...
(we are still not done)
We took out the upper cabinets in the kitchen with the intentions of doing open
shelving and putting in new counters.
Well long story short, no money for the counters
right now but we already removed the tile backsplash
which damaged the drywall.
So......you know me.....
What can I do to make it look like I meant to do this?
And Cheap or no cost!
Well my brother Steve has access to free pallets whenever I need them
so I gave him a call!
 |
| As you can see the drywall where the backsplash was needed to be repaired. I also had to cut away the drywall where I needed to mount the L-brackets that I was going to hang my shelves with. |
 |
| This is the other side that needed the repairs. Can you see why I want new counter tops? When I reach that bridge I'll cross it. |
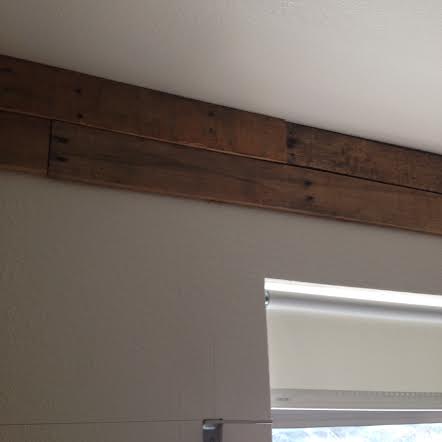 |
| After spending three days of hard labor dismantling pallets I started to install the wood on the walls behind the sink. BTW...I learned how to use my husbands air-compressor and air gun by looking it up on You-Tube! I love the tutorials on You-Tube! I AM WOMAN!!! (Although I wish my man was around to dismantle those pallets!) |
 |
| Heavy duty L-Brackets are installed into the studs and I made sure they were level! (Yes I made that stained glass window) |
 |
| Not a perfect job on the drywall but who cares since it will be concealed by the wood. |
 |
| Drywall done, check! |
 |
| Two days of Installing the wood and a lot of getting up and down off the ladder! I was soooo tired but satisfied it was all in! Now I was really torn because I really liked the wood look and I planned on painting it. But ultimately you have to go with your gut so I decided to paint it because it was dirty looking and would make my kitchen look very dark. And besides I wanted more of a "Beach" vibe. |
 |
| So notice how I concealed the L-Brackets so that I could make my shelves look bracketless. |
 |
| Now I built the shelves. Got the instructions on Pinterest for the shelves and I did my own rendition of them with scrap wood. |
 |
| The finished product after a whole week of working on this! I absolutely love having open shelves! Easy access to all of my stuff! |
 |
| Now I'm ready for the next project! Have to paint the cabinets and make a roman shade for the window. And perhaps one day I'll get those new countertops? |
No comments:
Post a Comment